Custom Search


I really love getting feedback from you....so please leave a comment
and become a follower of my blog!
Showing posts with label Barry M. Show all posts

Tuesday, January 11, 2011

BarryM Instant Nail Effects - Crackle Manicure

My sister finally came home from England for a visit and she brought me the BarryM Instant Nail Effects crackle polish I'd been waiting for for months.  I was really excited to use it...and then OPI's crackle polish ended up coming out at the same time, so these crackle manicures have been popping up on many nail polish blogs.


Anyhow, here is how mine turned out:


I used Sally Hansen "White Out" as the first coat, but I probably should have applied more than one coat for a less streaky foundation. I was so excited to try the crackle polish that I really didn't even let that one coat dry enough - thus the smudgy looking thumb.


BarryM's crackle polish works great and with a coat of Seche Vite over it, it's lasted just fine for about a week already! I've had many interested people asking questions about this manicure, and I've received a lot of attention because of it!  So, if you can get your hands on BarryM's version, I'd certainly recommend trying it out.


Will you try a crackle manicure any time soon?

Tuesday, October 5, 2010

Fall Floral

My sister brought me this Barry M polish when she visited back in the summer, but I just got around to using it this week.
Konad IP m57
black dots made with a dotting tool

This is Barry M's "Mushroom" with flowers stamped in "2030" from China Glaze's Khrome Collection from last fall/winter. I finally managed to get my hands on  a few of the Khrome polishes and they are awesome for stamping...but you have to move FAST! They dry really quickly on the stamper and won't stick to your nails unless you work swiftly!


I didn't have daylight when I had time to do my pics, so the photos aren't the best. Still, I really like how this turned out. I'm not typically a fan of how these "pooey" colours look on me, but this one isn't too "greige" so I think it's somewhat flattering.

What do you think?


Sunday, June 13, 2010

EOTD - Makeup Look, For A Change (pic heavy)

I don't know how you guys feel about seeing a makeup look on a nail polish blog, but I really like how my eyes turned out today, so I figured, why not?!
The reason I tried such an intense look today was because I wanted to get a new lid primer...let me explain better. I usually use MAC Paint Pot in Painterly, but it's been getting dried out, and also, I don't love having to stick my finger in a pot because product always gets stuck under my nails.


I was at Shopper's Drug Mart and the lady in the makeup section recommended Smashbox Photo Finish Lid Primer.  I bought it, and wanted to test it out. It's a lot thinner/sheerer than the paint pot I'm used to, so I was somewhat doubtful that it would cover my naturally discoloured lids.


I'm actually impressed so far.  It did provide a nice neutral base, though I don't think I'd wear it alone, as it recommends you could. It did grip the eyeshadow nicely, and didn't seem drying, as some reviews claim it is.  I did use MAC Fast Response Eye Cream first, and that is a product I totally love!
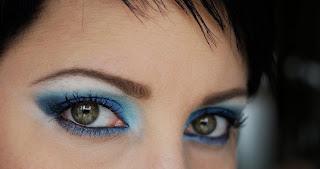

I didn't see much creasing, and the makeup is lasting all day, so I'm impressed. Now, to tell you what else I used to create this look...


To fill brows: MAC Coquette e/s and a bit of Carbon e/s
Highlight: NYX 02 White - it's great quality, matte, and way cheaper than MAC!
waterline: Annabelle eyeliner Black
Liner - Annabelle Lapis
Shadow - Barry M Dazzledust 20 Baby Blue all over, then MAC Contrast (darkest navy blue in crease and outer corner), Barry M Fine Glitter Dust Denim (fgd20) on the lid and over eyeliner (top and bottom lash line), and MAC pigment A66 Clear Sky Blue and NYX White to lighten tear duct and to blend out where Contact meets White.
Mascara - Maybelline Volum' Express The Falsies Blackest Black (just bought it and love it!)

So that's it. Please let me know what you think...

Saturday, June 5, 2010

Barry M - Mint Green


This is nothing special, but for some reason, the colour just looked so fresh and beautiful plain, that I didn't stamp over it. That, and I had a very busy week!  


I love this polish. I'm lucky my sister lives in England and brings me back a few bottles of Barry M when she comes home to visit.

The colour is more accurate in the bottom picture, which I took outside on my front porch.


Hope this post wasn't too boring....but I'll post a konadicure very soon!

Hope it is sunny wherever you are. Have a fantastic weekend, everybody!

Friday, April 23, 2010

Glittering in Grey


It's been a while since I loved a mani that wasn't a konadicure, but I really like how this layered manicure turned out!


So how did I get all this glittery goodness?  I started with one coat of Barry M "Grey", a dark charcoal creme.  Then I layered one coat of Nubar "Hologram Glitter" over it.  Finally, one coat of Seche Vite really brought out the sparkle!


I know there are a lot of similar pics in this post, but I was trying to capture the multi-coloured holographic glitter in different lighting situations.  I took some photos a bit out of focus because the blurry ones show off the awesomeness of Nubar's "Hologram Glitter". 


One more pic. No reason, I just had trouble choosing - and I still have tons more I didn't use!  


All images are clickable, so go ahead and click to see the glittering grey manicure close up, and let me know how you like this look. 


Have a great weekend, dear readers.

Tuesday, April 13, 2010

Beads & Bows - Konad m76 & m77


Barry M "Mint Green" (2 coats)
Konad designs in Special White


For this konadicure, I used Barry M's "Mint Green" which is a great polish that fits with the pastel trend many polish brands are showing this spring.  (Notice the Barry M green glitter dust in my hand?)

Then I used two designs, one from m76 and the other from m77, since they both featured bows.  I added three little glass balls in the centre of the bows. I found these in the dollar store. I guess they weren't really meant for manicures, because after I applied topcoat to the tiny green beads, the colour seemed to melt off.


I wore this to work today and got a few compliments.  Isn't it fun when people notice your little masterpieces?

I hope you have a great week and that you enjoy this konadicure.  Let me know what you think of it...

Tuesday, January 26, 2010

Hippie Flowers


Barry M "Pink Flamingo"
flowers from Konad IP m74 in Special White

This is a konadicure I was inspired to create after my sister came home from England bearing gifts from Barry M. This is "Pink Flamingo" which is a new polish in this awesome line from the UK. There you can buy their polish, lipsticks and eye shadows in drugstores and department stores and they aren't overly pricey. I love their bright creme coloured polishes. Their dazzle dust and glitter dust eye products are also my faves!

Okay, back to the nails. Even though this is quite a summery colour, I decided to use it in the dead of the Canadian winter. I added flowers from Konad IP m74 in a random pattern to create a slightly different design on each nail. Then I added dots of various colours to the centre of the flowers by using a dotting tool. I love how the dotting tool allows you to make very uniform dots!

Hope this konadicure helps you make it through the long days of winter!
Related Posts with Thumbnails